Draw My Own Sidewalk Plan
How to Cascade a Concrete Sidewalk
Get in smooth, durable and cleft-gratis.
![]() Time
Time
Multiple Days
![]() Complication
Complication
Intermediate
![]() Price
Price
$501-chiliad
Introduction
Form and pour a new concrete sidewalk; the perfect first concrete project for the beginner. Replace that ugly, cracked walk with a apartment, shine new 1. Nosotros bear witness you lot how to build forms and so place and shine the wet physical, all with first class results. You save big coin too.
Tools Required
Materials Required
- 1 2-in.wide Forest stakes
- 1-1/4-in. screws
- iv-mil Plastic sheeting
- Concrete
- Concrete mesh
- Expansion strip
- Gravel
- Hardboard siding
- Spray paint
Planning and Tools
If the idea of pouring concrete scares the bejeebers out of you, don't experience like the Alone Ranger. This story volition teach you the basics so you lot'll exist confident and ready to become when the concrete truck pulls upwards to the curb. And y'all'll save the concrete walkway cost of hiring concrete pros to boot.
A giant ready-mix truck driving upward to your house can be intimidating. I always get butterflies when I hear the diesel fuel roaring a half mile away. But being prepared with solid forms, skillful equipment, a couple of strong helpers and a well-planned wheelbarrow route will help calm the nerves. Once you dump the first few wheelbarrow loads and go the hang of moving the moisture mud around, you lot'll experience in complete command.
Concrete might be the cheapest edifice fabric on the planet. Information technology'southward hard to imagine a textile that gives more bang for the buck than concrete for the cost of sidewalk. What other textile yields a permanent, finished, durable, maintenance-complimentary outside surface at a low price and a day's piece of work? Around these parts, many contractors won't put downwards a gravel base or even use steel reinforcing. Bonus: Your sidewalk will be stronger and last longer than many professionally poured sidewalks. In addition to the concrete walkway cost, suppliers usually add a 'brusk load' charge for small orders (more often than not under iii yds.). This iv-ft. wide by 60-ft. long and 4-in.-thick walk required just over 4 yds of concrete.
Plus, if yous have a concrete walkway that needs to be redone, cheque out our proficient tips, tools and planning communication to guide you through concrete demolition that volition save you big bucks.
Project step-by-step (23)
Step 1
Front Walk Site
You may need a building permit—cheque to exist sure. At this site, we didn't demand a edifice allow for a residential sidewalk on private property. But take 5 minutes and call your local building inspector to make sure that'south true in your area. Y'all'll salvage some embarrassment and mayhap a fine. Stick to sidewalk projects in flat or gently sloping areas. Calculation steps is much more complicated.
Y'all're going to need a couple of heavy-duty wheelbarrows, shovels, rakes and a variety of professional person-grade concrete finishing tools. Nosotros describe the tools in detail below. The hand tools may be worth ownership if you intend to pour more physical downwards the route. For a pocket-size price, you can own a set of high-quality tools (minus the wheelbarrows) for life and non accept to hassle with rentals. Take heed. Concrete is heavy and time is short. Once the prepare-mix truck (the physical is premixed and ready to cascade) shows upwards, you and your helpers will exist muscling around 200-lb. wheelbarrows over gravel. This work is intense—you won't be taking whatsoever coffee breaks for a while.
After pouring and screeding, you may come across things slow downward a flake, but they tin can go a trivial frantic once again when the concrete begins to firm upwardly. Follow the tips and advice in this commodity, become ahold of the right professional-grade tools, line up at least two reliable, bulky helpers and option a skilful weather day, and yous'll terminate upwards with a long-lasting, attractive sidewalk you'll be proud to carve your initials into.
Pace 2
Two Heavy-Duty Wheelbarrows Can Save the Day
Secure your tools a day ahead of time or at least contact the rental shop to reserve them for the pour 24-hour interval to brand certain they're at the site when the truck comes. Hire each of these tools:
- Contractor-grade wheelbarrows with leak-free tires. Even on small pours, you'll be in big problem if your sole wheelbarrow gets a flat tire or a broken handle, and then become two! It'll also speed up the pour. A full set up-mix truck at the curb with no way to unload it is expensive. Physical is heavy. The neighbor's garden-grade petunia hauler volition collapse under a load of physical, and the hard, narrow tires make for tough wheeling in soft ground or gravel.
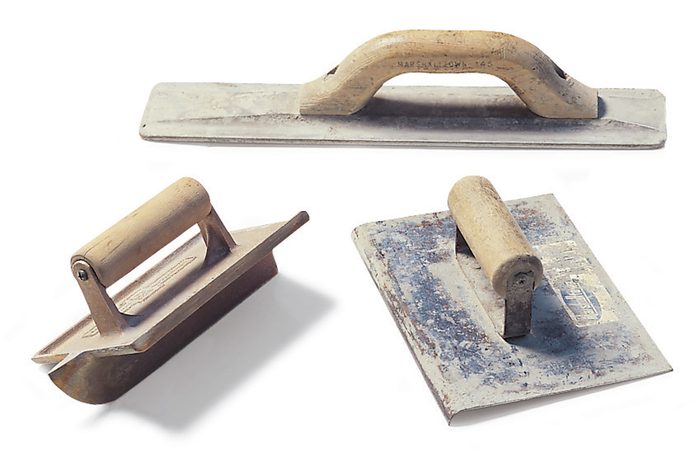
- Bull float with an extension handle.
- Physical broom (apply the handle from the bull float).
- A groover that cuts control joints 1 in. deep. If the rental store but has groovers for shallow cuts, use information technology to shape the joints and deepen them with the corner of a trowel or a stiff putty knife. Unless the grooves are at to the lowest degree one-quaternary the thickness of the concrete, they're of little value.
- Two magnesium hand floats.
- Two edgers.
- Atomic number 26 rake to motility around wet concrete. In improver to the earth-moving equipment for the excavation work, you lot'll demand:
- 2-lb. hand maul for pounding in stakes.
- Bolt cutters for cutting mesh.
- Sod cutter if you have lots of grass to cut through.
- Spiral gun for anchoring forms to stakes.
- Circular saw for cut forms.
- Marking paint for outlining the walkway.
Tip: Fill up a wheelbarrow with water, and brush and rinse off your tools every fourth dimension you lot use them.
![]()
Footstep three
Layout the Walkway
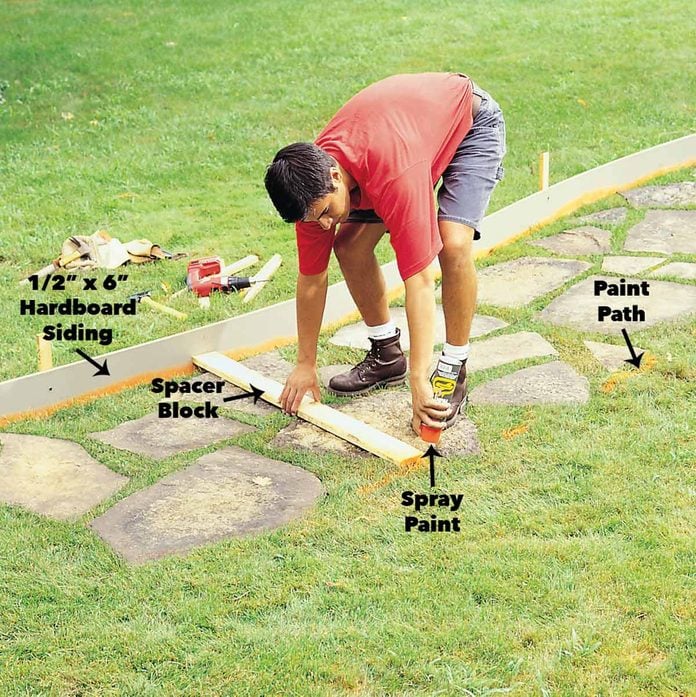
Excavation out the path is fourscore percent of the job. Lay out the path with half dozen-in. ripped strips of hardboard siding tacked to temporary stakes. Flex information technology to the desired shape of your sidewalk and stake it downwards. That'll not only give yous the overall shape but too provide the forms to mark the outline for earthworks. You'll as well observe out if curves are too sharp for the bending qualities of the siding.
Employ marking pigment (upsidedown spray paint) to marker the basis next to the course. To outline the sidewalk for earthworks, mark the unformed side using a spacer block.
Step 4
Dig Out the Sidewalk Path
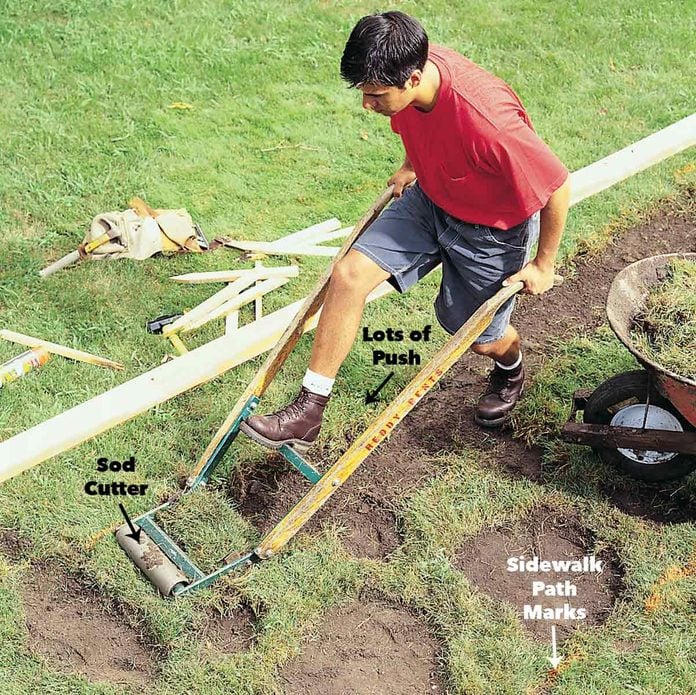
It took 2 of u.s. a whole twenty-four hours to cut off the sod and dig out the path to fix the base for this sidewalk. Believe it or not, pouring and finishing the sidewalk was easier, faster and a lot more fun than excavating. Tree roots, stones and heavy clay made for tough excavation. Renting a sod cutter( rents for $16 a day) to remove sod, and using axes for cutting out roots and pickaxes to loosen soil make the job a little less blister-producing.
Beginning thinking about drainage problems at this point. If water tends to collect in the thousand in spots, you may want to drag the walk in those areas, so don't dig equally securely there. Long, flat areas should have 1 side of the sidewalk lower so water can bleed off the side.
Piece off sod with a sod cutter, and so dig out the balance of the sidewalk path to a depth of 6 in. Dig out about 3 in. wider on both sides of the paint marks to leave room for forms. Set aside some topsoil to fill up against the forms and sidewalk later.
In nigh cases, make the top of the finished walk even with the (freshly cut) top of the grass for easy mowing and a peachy, make clean appearance. The lesser of the trench volition be about 6 in. beneath grade to allow for 4 in. of gravel below the 4-in. thick slab of concrete. If your sidewalk abuts some other sidewalk or driveway, continue the top of the sidewalk at the same level or build in a 4- to vii-in. step at the transition. Don't make a footstep that's shorter than 4 in. You'll trip every dinner guest who comes over.
Tip: If you don't have a place to dump backlog soil and sod, rent a trash container for a couple of days. We ordered a x-k unit for $225 that handled everything nosotros dug out.
Step v
Build the Forms: Drive Stakes Every iii Anxiety

Use cheap hardboard siding to form even the tightest curves. Directly concrete forms are generally made with sturdy two-past lumber, simply curves call for a more flexible material. Concrete pros utilise 12-in. hardboard siding ripped downwards to 6-in. strips in 16-ft. lengths. Total-service lumberyards and home centers carry all this forming textile too as reinforcing mesh and expansion strips you'll need. Roughly mensurate the length of the walk and divide it by sixteen to become the number of siding pieces needed. Hardboard siding's inexpensive, then buy an extra length to make sure you accept enough.
Besides, option up enough forest stakes to anchor each side of the grade every 3 ft., a 1-lb. box of i-1/iv in. drywall screws for anchoring the forms to the stakes and enough 6-in. (the size of the grid openings) steel reinforcing mesh to lay in the whole sidewalk trench. Pound in two stakes almost 1 ft. from the ends of the form positions. Screw the forms to the inside of the stakes with a couple of ane-1/4 in. drywall screws. Bend the forms to make smooth curves, anchoring them with more than stakes every 3 ft. Proceed the tops of the forms about ane in. above the cut grass height for easy mowing and a dainty appearance.
Tip: Getting the long, flimsy strips of siding home from the lumberyard is tricky, even in a pickup truck. Buy a sixteen-ft. 2x4 to stiffen the stack of siding and wrap packaging record around the whole works for the ride habitation. Don't forget to staple a cerise flag to the end of the load for safety. Afterward on, you'll use the 2x4 for making temporary forms chosen bulkheads.
Stride half-dozen
Reinforce Form Joints
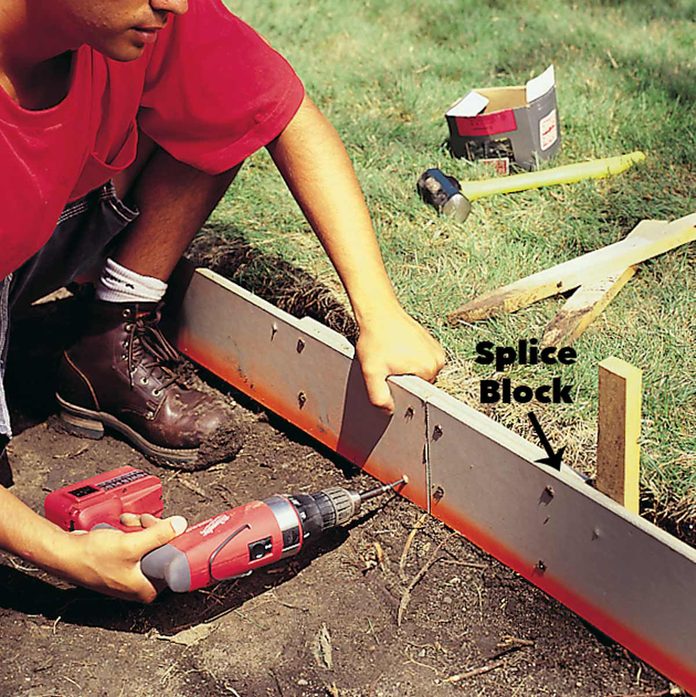
Cut xviii-in. lengths of grade material and screw them to the behind of the ends of the forms with 1-1/4 in. drywall screws. The splice volition shine out the curves at butt joints.
Step 7
Space and Form the Second Side
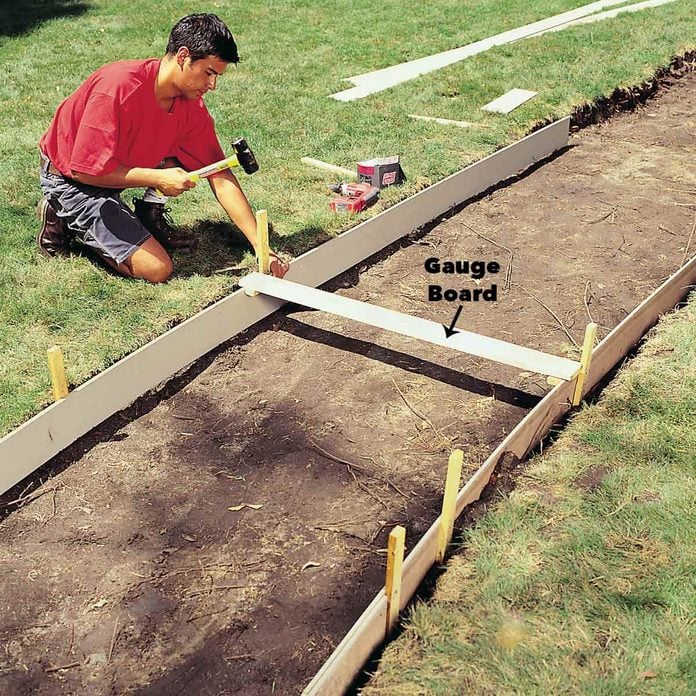
Space and level in the reverse grade sides using a homemade guess lath-just a one×4 that's a few inches longer than the width of the sidewalk. Screw curt blocks onto the bottom spaced the same width equally the sidewalk. Use this estimate board to position the forms and stakes to go along a consistent width the entire length of the sidewalk. Rest a 4-ft. level on top of the judge lath to go on forms level from side to side.
To keep your finished sidewalk dry—slope the forms. Our sidewalk path'due south consistent, natural gradient abroad from the firm toward the street provided practiced drainage. So we made the forms level from side to side. If your class has dips or level sections, gradient the sidewalk in those areas by dropping ane side of the forms 1/4 in. for each foot of sidewalk width. A 4-ft. wide sidewalk should have ane edge nearly one in. lower than the other in level areas to prevent ponding or ice accumulation during the winter.
Stride 8
Pack the Soil
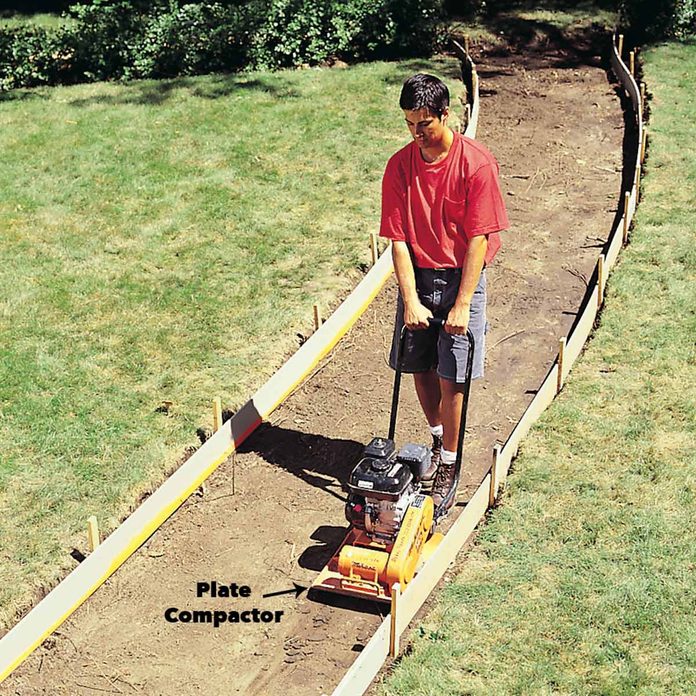
Pack the underlying soil with a plate compactor (rental). It'due south important to uniformly pack the entire base of operations (including the sides near the forms).
Step 9
Spread Gravel
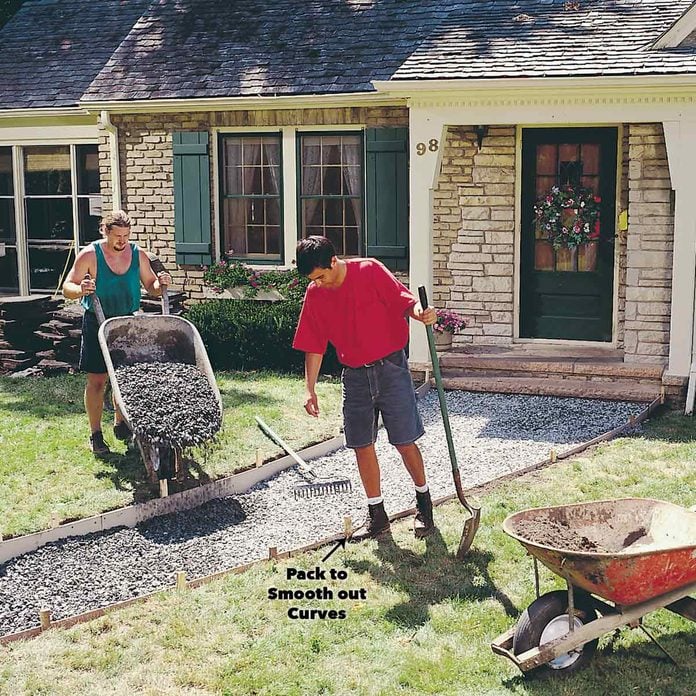
For a long-lasting sidewalk, plan on a 4-in. base of operations of gravel under 4 in. of concrete. If you live in a frost-free climate with a natural sand base with good drainage, you tin can pour right on top of the sand. But other soil types will aggrandize and contract with weather condition weather and tin can cleft overlying concrete. Gravel protects concrete from these shifting conditions. Just about any gravel works well, simply 3/4-in. crushed rock is easy to shovel and packs well and so you tin run heavy wheelbarrows on information technology without the wheels bogging downwardly. Gravel is ordered by weight, not book like concrete. Dissever the gravel volume by 1.4 to calculate the tonnage to order (see "Club the Right Concrete Mix below" for help).
Spread gravel four in. deep between the forms. Pack dirt against the outside and gravel against the inside of forms to add together back up when pouring and to reach smooth curves. It's non necessary to compact the gravel.
Step x
Cut Physical Mesh to Fit
Steel mesh and expansion strip forestall heaving, swell and buckling. Mesh comes in five-ft. broad, 25- or 50-ft. long rolls. Some lumberyards also carry 5 x 8-ft. flat sheets of mesh that are easier to handle only cost more per square pes. If a roll is a piffling too curt for the job, end upwards the rest with these sheets rather than ownership a second scroll.
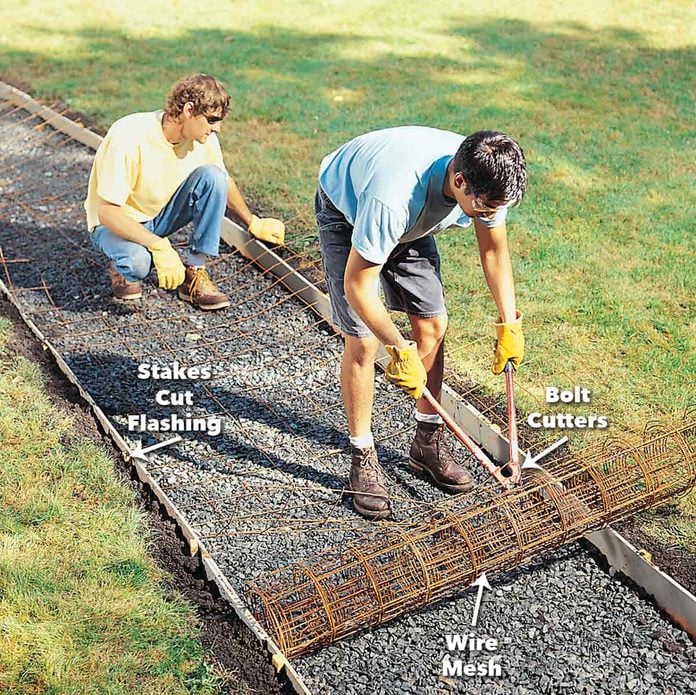
Cut off the stakes affluent with the tops of the forms. Park a helper on the finish of the reinforcing mesh for ballast and unroll the mesh, holding information technology down with your anxiety. Cut information technology to length with a pair of bolt cutters. Flip the mesh over and pull one cease toward the other to back-bend it slightly to eliminate the natural curl. Cut the edges of the mesh at least 3 in. back from the forms.
DON'T LOSE AN Centre! Mesh is wound like a spring. Later you cut a length, it tin can leap back at you with steel fangs. Wear prophylactic spectacles and brand sure you and your partner understand that neither of you steps off an cease without warning the other.
Step 11
Wrap Mesh Ends
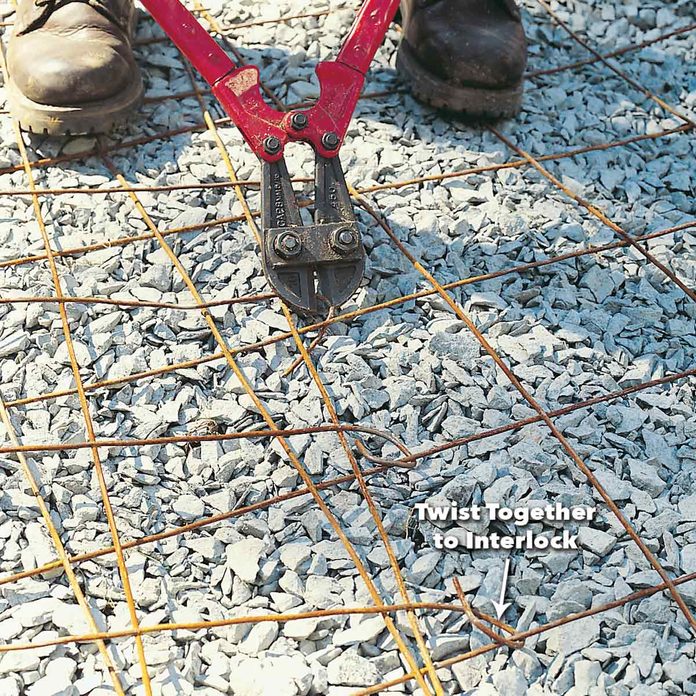
Overlap mesh layers at least 6 in. and join them by either twisting cut ends around the next sheet or wrapping wires on each 6-in. square.
Stride 12
To Keep Your Concrete Walkway Toll in Check: Social club the Right Concrete Mix
Order the concrete a few days ahead. If rain threatens, yous can normally cancel upwards to two hours earlier delivery. Although dispatchers are quite helpful in helping you determine concrete walkway cost, you lot should at to the lowest degree know the nuts earlier you call:
- Calculate the right volume. Concrete is always ordered in cubic yards. First figure out the cubic footage, so convert to yards by dividing by 27. Here's how: Multiply the length of your sidewalk times the width times the depth (4 in. = . 33 ft.) and divide the total by 27. Using our sidewalk as an instance: threescore ft. (long) 10 four ft. (wide) x .33 ft. (deep) = 79.2 cu. ft. ÷ 27 = 2.93 cu. yds. Concrete is cheap and nothing'southward worse than coming up brusk (except rain). A good dominion of thumb is to order an extra five pct rounded up to the next 1/4 yd. to handle spillage and uneven bases.
- Social club from the nearest supplier. Get fresh concrete mixed near the site, not mixed across town by some company with a lower cost.
- Ask for 5 pct "air entrainment" in the mix. Suppliers add together a chemical that traps microscopic air bubbles to assist the concrete handle the expansion and shrinkage caused by climatic changes such as freezing.
- Get the correct strength. Tell them you lot're pouring an exterior sidewalk and they'll recommend the correct "handbag mix" (ratio of cement to gravel and sand). In cold climates, they'll probably suggest at least a 3,000-lb. mix. That means concrete that'll handle a three,000-lb. load per square inch without failing.
- Accept your checkbook gear up. Y'all'll accept to pay on commitment after the physical'south unloaded.
The truck comes with the concrete premixed with the correct water content. But the commuter may send a piddling concrete down the chute and ask if you lot'd like more water added. Unless the mix is too dry out to get down the chute, forget information technology. The mix should be thick—not runny. Wetter mud may be easier to place (fill the forms), but the wetter the mix, the weaker the physical.
Step 13
Video: How to Pour a Concrete Slab
Footstep 14
Pour the Physical
Watch the atmospheric condition aqueduct; dry out, cool atmospheric condition is the all-time for pouring. The quickest route to disaster is an unexpected rainstorm, either in the middle of your pour or during the finishing procedure. If there's a take a chance of pelting on the cascade solar day, abolish the order and fix it up for a dissimilar day. During normal summertime weather (lx to 80 degrees F), you'll need 3 to five hours to pour and finish. Don't order physical for delivery too late in the day or you'll exist finishing in the night. To ensure a potent sidewalk, avert very hot days and days that are followed by freezing nights.
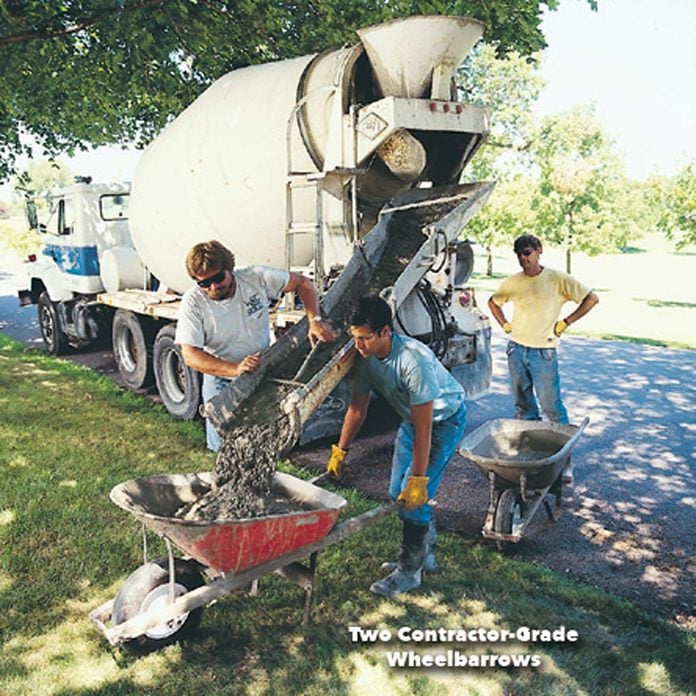
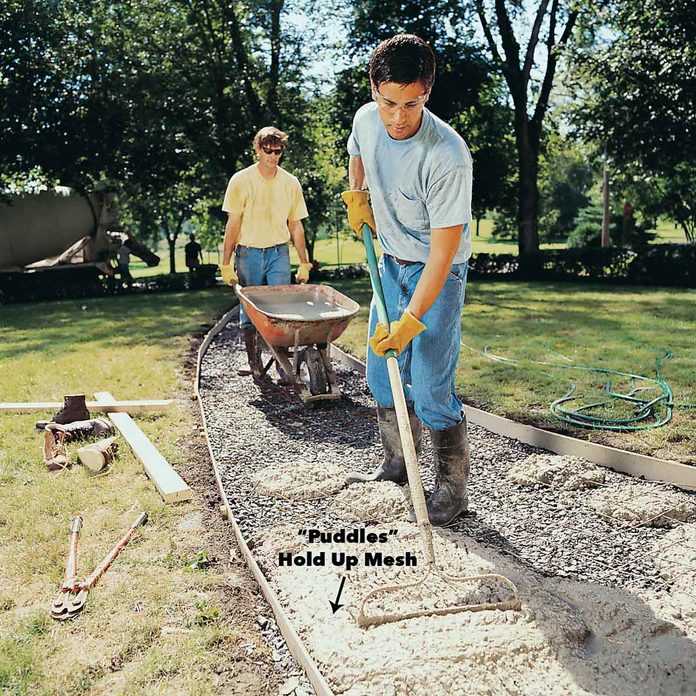
Accept three helpers set up to haul and level the concrete. Dump the concrete into the forms. Hold the mesh 2 in. higher up the gravel with small globs of concrete while pouring the sidewalk. Pour a few feet of physical, heaping it slightly higher than the forms. Don't shovel concrete; pull it back or push it forward with a steel rake.
Step fifteen
Level and Flatten with a Screed Board

Afterwards dumping the concrete into the forms, level the concrete as y'all pour every few anxiety with a screed board (a straight 2x4 about 1 ft. longer than the width of the sidewalk). Rest the screed board on the forms and use a sawing move while pulling the lath toward the cease of the pour. Fill lower areas with fresh concrete and echo screeding over the same surface area.
With three people, have one person screeding and directing wheelbarrow dumps while the other two haul concrete to go along the project moving along. The person who'southward screeding can usually too go back and practice large sections of bull floating over freshly screeded areas.
Tip: For shine sides, tap the sides of the form every couple of feet with a hammer to work out air bubbling. Wear safe glasses; physical will splash.
Step 16
Flatten the Surface with a Balderdash Bladder
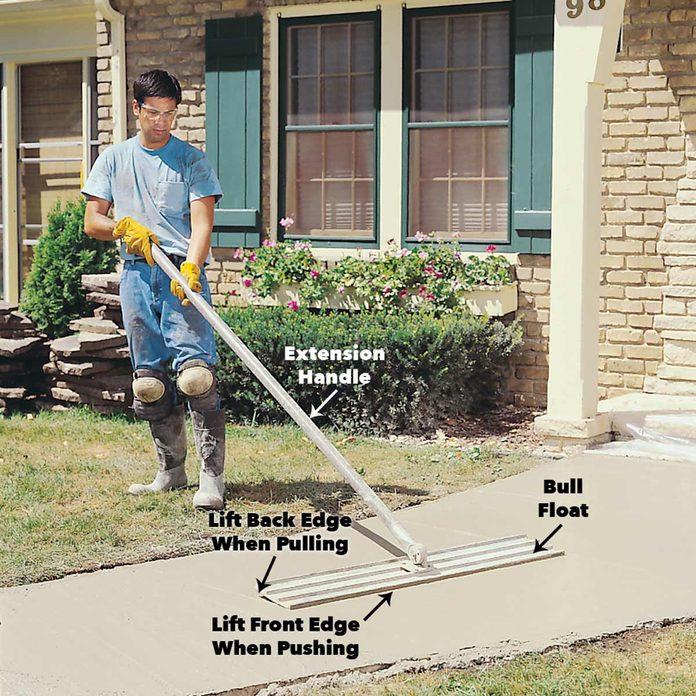
Draw a bull bladder over the fresh concrete immediately after screeding to strength downwardly amass and raise cream (gravel-free physical) near the surface for finishing. Only use the bull float correct after screeding if there'southward no bleed water nowadays. Drain water is h2o that migrates to the surface from the fresh concrete in small pools. Await carefully; bleed water can be hard to spot. Don't work concrete with bleed water present; look until information technology reabsorbs or evaporates. It'll seriously weaken the surface, which may flake off later on. Wait until it disappears before using the bull float or hand bladder. Work in the reverse direction of screeding and push the balderdash float away from you lot, slightly lifting the leading edge, and then pull information technology back while lifting the back edge.
Stride 17
Working with Concrete Safely

Concrete is a fabled, cheap paving material. But equally any emergency room doctor can attest, its benign appearance belies a caustic, highly alkaline nature. Wet concrete on skin can cause everything from mild redness to tertiary-degree, permanently disfiguring chemical burns. A few drops of concrete isn't dangerous, but avert practices similar working in concrete-sodden clothes, concrete-filled boots or gloves wet with concrete juice. It'll keep y'all out of the hospital waiting for skin grafts. Take these steps to protect you and your helpers.
- Wear middle protection. Sandy concrete splashes can wreak havoc with your eyes.
- Vesture long pants and long sleeves to protect your peel. (We didn't only because it was very warm and humid. Merely we did rinse off any pare that got splashed.)
- Vesture tall rubber boots if y'all have to wade in wet physical.
- Wear gloves (rubber gloves are the safest bet).
- If your clothes get saturated with wet cement, remove them, thoroughly rinse your skin and change into clean clothes before going back to work.
Stride 18
Shine with a Mag Float

Await until any bleed water disappears and hand bladder the surface with a magnesium float, starting at the beginning of the pour. Apply sweeping motions, lifting the leading edge of the float slightly.
Here's what you demand to know to shape and smoothen fresh concrete. Start mitt tooling (floating, edging and grooving) when you can't push your thumb into the surface more than than 1/4 in. The series of stride-by-step photos may give the impression that each tool is used only in one case for a specific task. While that'southward true of the bull float and broom, you'll need to switch betwixt the hand tools throughout the finishing process every bit the concrete firms upwards. Use the mag (magnesium hand float) to resmooth areas and to work out holes as they appear. You'll also use it to soften transitions between edges, corners and control joints after they're cut in, and to shine ridges you produce with the groover and edger.
Wait until any drain h2o disappears and hand bladder the surface with a magnesium float, starting at the beginning of the pour. The first fourth dimension is easy; lite pressure will even out the surface Apply sweeping motions, lifting the leading edge of the float slightly. Every bit the mud continues to set up, you'll have to work harder and harder to smooth out imperfections. Toward the cease, you'll have to put both easily on the mag's handle and scrub to smooth problem areas.
Step 19
Round Over Edges
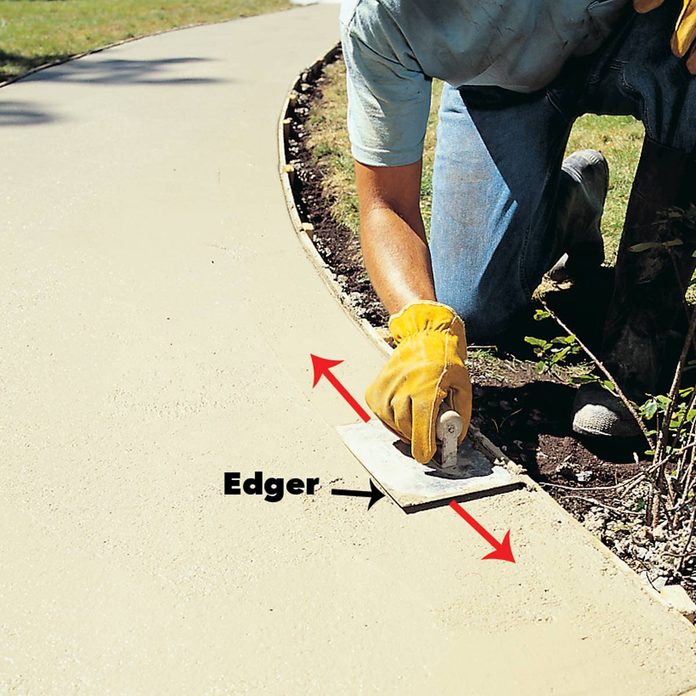
Round over the outside corners with an edging tool. Make the first laissez passer with the edger and groover when the concrete is just beginning to firm upwardly to class the crude shape. Utilize them to push the aggregate (gravel in the concrete mix) abroad from the rounded edges. Use a back-and-along move in a 1- to two-ft. surface area, lifting the leading edge on each pass and working your mode down the sidewalk edge. The next pass gives a more than finished shape as the physical begins to harden. One last time polishes the final shape and smoothes out inconsistencies. Always work the physical from where you poured first. Avert overworking the physical. Your goal is to create a flat, ridge-gratuitous surface for the broom finish. If you tool the surface too much, you'll weaken it.
Tip: If the physical "gets abroad from you" (sets up faster than y'all can terminate it), just concentrate on getting the manus floating, edging and brooming done and forget the control joints for at present. You lot can always hire a diamond masonry saw and cut in the 1-in. deep control joints some other day. Focus first on getting a good-looking surface.
Footstep xx
Cut Command Joints
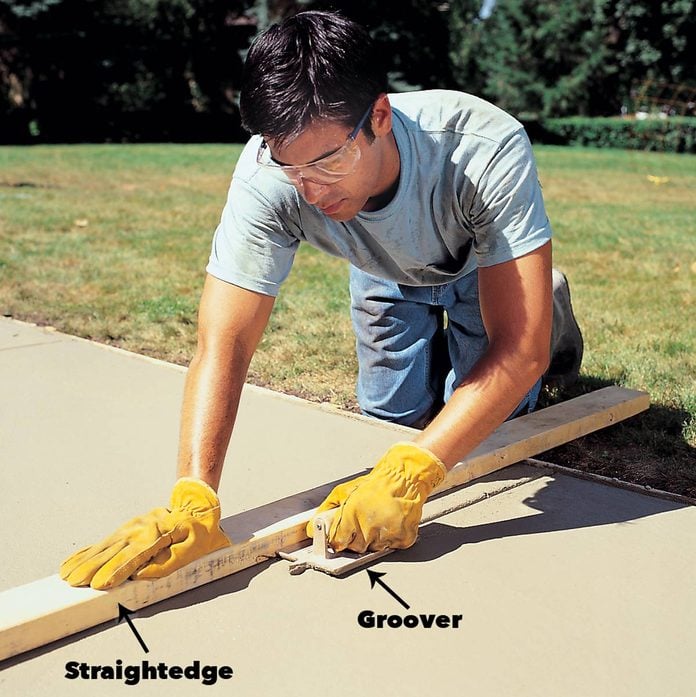
Cut in command joints every 5 to 6 ft. with a groover. Program your cuts by measuring the length of the pour and evenly dividing it then all the segments are virtually the same length. During the first pass, use a direct board held perpendicular to the forms for guiding the groover.
Step 21
Texture the Surface
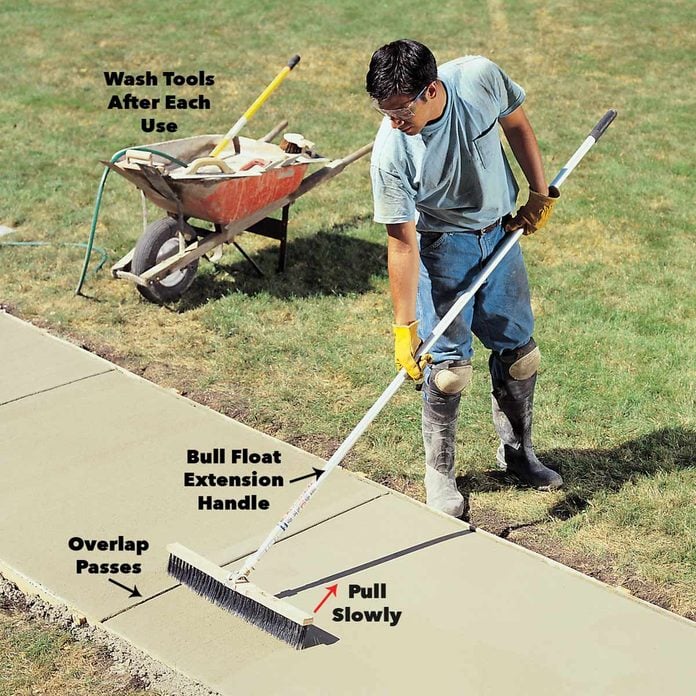
Gently rest the broom on the far side of the sidewalk and slowly pull it toward yous and off the border of the form. Piece of work your fashion downward to the end of the sidewalk, overlapping previous sweeps about 6 in. If clumps of concrete start gathering or you feel the texture is too rough, the concrete is still too wet to broom. Go over broomed areas with the magazine bladder to shine out marks, and try again in xv minutes.
Footstep 22
Add an Expansion Strip
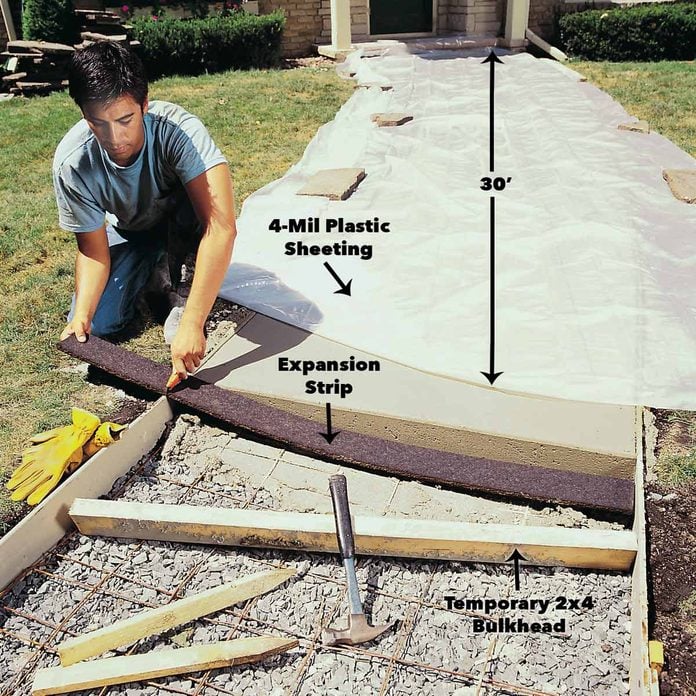
If you lot can't pour it all at once, dissever the pours with bulkheads. To brand sure we had plenty time to work the physical, nosotros had half the load of concrete delivered in the morning for the first 30 ft., and the other one-half in the afternoon. That way, we knew exactly how much to social club for the second load. After the truck emptied, we installed a temporary bulkhead while we finished the first one-half. With 2 helpers, don't exist afraid to pour thirty ft. of sidewalk a day. Afterwards that, you lot'll know exactly what you can handle. A bulkhead is also a mode to end a cascade if you come upwardly short on the order. You lot tin throw in a bulkhead and order the rest later.
Pull off the temporary bulkhead afterward brooming and lay in expansion strips before continuing the next section if yous're pouring 2 separate segments. Expansion strips are asphalt-impregnated fiber strips that shrink when physical expands to prevent heaving, bully and buckling. Pick up 4-ft. expansion strips for each 30 ft. of the sidewalk and for ends where the sidewalk abuts other unyielding masonry surfaces such as driveways, other sidewalks, house foundations and steps. Keep the peak of the strip fifty-fifty with the bottom of the rounded border of the concrete.
If you're doing the sidewalk in one cascade, slip the expansion strip into the wet concrete every thirty ft. and utilize the edger to circular concrete edges.
Tip: If you need a fiddling stoop or pad somewhere out in the k, having it formed upwardly ahead of fourth dimension gives you a place to put backlog physical to good use!
Step 23
Mottling Eventually Disappears

Later finishing, cover the sidewalk with iv-mil plastic to get maximum forcefulness. Although y'all can walk on concrete the day afterward finishing, it takes about a month for information technology to accomplish most of its full strength. Concrete needs water to cure (harden) properly. In club to accept a strong sidewalk that won't scale, spall or crack, encompass the sidewalk with plastic sheeting after brooming. (Encompass the concrete once your fingertip no longer leaves an impression.) Ballast the sides of the plastic with boards, bricks or stones to keep it from blowing off. Leave the plastic on for a day, then keep the concrete moisture for a few days by occasionally running a sprinkler or soaker hose to slow down the curing procedure. After removing the plastic, you may see grayish-blue mottling on the physical surface where the plastic contacted the concrete unevenly. These marks will eventually fade (ours took two months to disappear) and crusade no lasting damage. To prevent them, cascade on a cool, clouded mean solar day or plan your pour so it'south finished late in the day. That way, the plastic won't have whatsoever direct sunlight baking the surface under information technology.
Resist the temptation to remove the forms; expect until the adjacent twenty-four hour period. The day subsequently you pour, pull the forms by jamming the tip of a shovel into the stakes and prying against the ground to elevator the whole works out of the ground. You'll crack sidewalk corners or edges if you pull the forms the same day every bit pouring.
Plus, fake information technology until y'all get in with these inexpensive landscaping fixes that await expensive.
Originally Published: January 17, 2019
Source: https://www.familyhandyman.com/project/how-to-pour-a-concrete-sidewalk/